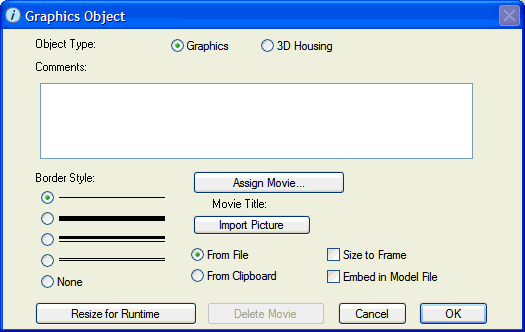
Use the Graphics Object dialog box to select the formatting options for a graphics frame.
To open the Graphics Object dialog box, select the graphics frame and then choose Open Selection from the Interface, Map, or Model menu, right-click the graphics frame and then choose Open from the menu that appears, or double-click the graphics frame's border.

Select the style of graphics frame you want to use:
3D Housing – Select this option to use a 3-D style. When you select this option, a 3-D style border is automatically applied (you cannot select a different border style) and you can select whether you want a dark or light fill.
Tip: By default, the light fill is gray and the dark fill is black. You can change the color of the fill by using the Paintbrush tool.
Use this box to record documentation (notes, thoughts, assumptions, etc.) about the graphics frame.
Select the style of border you want to use for the graphics frame.
Select this option to fill the graphics frame with a solid, dark color. By default, the dark fill is black. You can change the color of the fill by using the Paintbrush tool.
This option is available only if you selected the 3D Housing option under "Object Type".
Select this option to fill the graphics frame with a solid, light color. By default, the light fill is gray. You can change the color of the fill by using the Paintbrush tool.
This option is available only if you selected the 3D Housing option under "Object Type".
Click this button to have a QuickTime movie clip appear in the graphics frame.
Notes: If there is already a movie assigned to the graphics frame, an asterisk (*) appears on the Assign Movie button.
To assign a movie to a graphics frame, your computer must have QuickTime installed. The Assign Movie button is not available if QuickTime is not installed.
Note: For best results, put all movies in a directory entitled "movies", located in the same directory as the model file.
Click this button to delete the assigned movie from the graphics frame.
This button appears only if a movie is assigned to the graphics frame (when a movie is assigned, the Assign Movie button displays an asterisk).
Click this button to select a picture to appear in the graphics frame.
Note: This button is not available if a movie is currently assigned to the graphics frame. To assign a picture instead, you must first delete the assigned movie by clicking the Delete Movie button.
To assign a picture to the graphics frame, select the source of the picture and then click the Import Picture button:
Note: If a picture has already been imported for this graphics frame, an asterisk (*) appears on the Import Picture button.
For more information about adding pictures to graphics frames, see To add a picture into a graphics frame.
Notes: Note: For a list of supported image file formats, see Supported graphic file formats.
For best results, put all picture files in a directory entitled "graphics", located in the same directory as the model file.
Click this button to delete the assigned picture from the graphics frame.
This button appears only if a picture is assigned to the graphics frame.
Select this check box to have the assigned picture or movie resized so that it fits within the borders of the graphics frame. If this check box is selected and you resize the sector frame, the picture or movie will automatically resize accordingly.
Note: When you resize a movie to fit the frame, the subsequent movie playback may be "jagged". QuickTime is optimized to play best when the movie is at its default size.
Tip: You can use the Size to Frame check box to center a movie in the graphics frame after you resize the graphics frame. To do this, select the Size to Frame check box and click OK, then re-open the Graphics Object dialog box, clear the Size to Frame check box, and then click OK.
This check box is available only if you have assigned a picture or movie to the graphics frame.
Select this check box if you have opted to import a picture from a file and want to embed it in the model file when it is saved.
Note: If you want to share your model with others, use this option to avoid having to include a "graphics" folder with your model.